installation process
your design coming to life
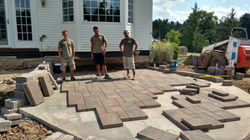
Step 1: dry-lay pavers and walls
After the base preparation is complete, we make all the cuts for the patio. This is when the steps, walls, fireplaces, and any custom features are designed.
 |  |
|---|---|
 |  |
 |  |
 |  |
 |  |
Step 2: apply adhesive and joint compound
After the cuts are made, all of the bordering patio pavers, seating and retaining walls, fire pits, and steps are glued into place. The glue is applied at the mating edge of the paver or block, which is then pressed against another. It is time consuming, but it ensures a quality installation. If the concrete is fresh, it will be releasing moisture for a few weeks so the glue is most effective when applied stone to stone, rather than only to the concrete.
Then polymeric sand is swept into the joints. The polymeric sand has an adhesive in it that bonds the rest of the patio pavers together. It is recommended that a 6 month curing period take place prior to sealing new pavers. This allows time for any efflorescence to come out.
As an educational note, we only use polymeric sand options that are made with clear polymers and not the lesser quality sand mix that is made with Portland cement. The low quality polymeric sand leaves a haze on pavers that is difficult to remove.
If you are applying polymeric sand to your patio, be sure to thoroughly follow these steps:
-
Sweep the sand into the joints and use a sharp object to poke the sand throughout the joint to ensure that all air pockets have been replaced with sand.
-
Compact all of the sand.
-
With the exception of certain wet application products, after sweeping the excess sand from the pavers, use a leaf blowing on idle to ensure removal of all sand from the paver surface.
-
Using very low pressure, apply water to the polymeric sand that is in the patio joints. Ensure that the sand saturates with water, but do not use so much as to wash it out.
-
Allow the polymeric sand time to dry and harden before applying sealer.
Step 3: patio lighting and appliances
The patio lights are actually installed throughout the whole patio installation process, depending on where the light fixtures are located. After the above section has been completed, they are connected to a low voltage power supply.
Any finishing adjustments on outdoor kitchen and patio bar appliances are also made at this time.


